> For the complete documentation index, see [llms.txt](https://docs.bravostudio.app/llms.txt). Markdown versions of documentation pages are available by appending `.md` to page URLs; this page is available as [Markdown](https://docs.bravostudio.app/integrations/push-notifications.md).
# Push Notifications with OneSignal
{% hint style="info" %}
**Requirements:**\
\- A mobile phone (Android or iOS)📱\
\- [OneSignal](https://onesignal.com/) account (optional)
**If sending to a published app:**\
\- [A Google account](https://accounts.google.com/signup/v2/webcreateaccount?hl=en\&flowName=GlifWebSignIn\&flowEntry=SignUp)\
\- [Apple Developer account with admin role](https://developer.apple.com/)
{% endhint %}
{% hint style="warning" %}
**In case your app is targeted to children** and you want to **publish to Google Play** (Android), **you won't be able to include notifications in it**, as per Google Play policy. Read more in the [Android publication guide](/app-publication/publishing-your-app/android-publication-complete-process/4.-get-the-aab-android-app-bundle-file-to-publish.md#request-for-android-publication).
{% endhint %}
## 👉 **The Tags**
#### Action: Enable notifications
**📍 Where to add the tag:** Any layer (except top-level app page).
```
[action:enablenotifications]
```
Start by adding this tag into a button or any UI element of a screen. This action triggers a pop up informing the user that the push notification has been enabled. When triggered, this action will also register your device on OneSignal.

{% hint style="warning" %}
If you add the tag to a group (like in our example), **the tag must be added to every element within the group**. See how it's set up on the sample app.
{% endhint %}
If the user accepts, that component will disappear. Note that in this example, we placed a “Push notification enabled” message just behind the button so it is shown after the user accepts the permission.
#### Action: Require notifications (Optional)
**📍 Where to add the tag:** Any top-level app page.
```
[require:enable-notifications]
```
How to set up [require:notifications] tag in Figma.
This tag enables the app to request for notifications permissions when entering a designated page, ensuring alerts aren't missed if previously dismissed by the user. It allows for triggering the notification enablement pop-up in various app sections, beyond the device's general settings.
{% hint style="warning" %}
The `[require:enable-notifications]` tag is currently supported in **Final apps**.
{% endhint %}
{% embed url="" %}
Bravo Sample - Push notifications
{% endembed %}
{% file src="/files/-MlBdPaksu3l2G0MsJL5" %}
Bravo Sample - Push Notifications.xd
{% endfile %}
{% hint style="warning" %}
**Google Play Publication Requirement:** \
The notification icon should have a **transparent background, white color and size 96x96**. If it doesn't meet these requirements, you'll see Bravo Studio's icon instead.
{% endhint %}
{% hint style="info" %}
**Disabling notifications** cannot be done directly from the app. This action needs to be handled by users through their device settings.
We suggest adding an informative text to guide users on how to turn off the notifications like "To turn notifications off, go to your device's app notification settings."
{% endhint %}
## :mobile\_phone:Test Push Notifications in Bravo Vision
You can test push notifications on Bravo Vision before your app is published.
{% hint style="danger" %}
Before sending the test, make sure that **the app is** **opened,** [**the push notification is configured in Integrations**](#setting-up-the-notifications-feature-in-bravo-studio), and **to trigger the enable action from your mobile device** to see the push notification coming in Bravo Vision.\
\
If not you will get an alert in Bravo Studio with this error message: \
\#422 Could not send the push notification. Please reload the page and try again.
{% endhint %}
1. Go to your app **project page**, click on the **three dots** located on top right of the screen and from the dropdown menu, choose **Push Notifications**.
2. Complete the notifications message by adding a title, message and setting the notification action. Bravo allows setting four different **notification actions**. These will happen when the users click on the push notification you send.
* **None**: the push notification will still be clickable, but nothing will happen upon clicking.
* **Show alert**: an alert message will be displayed once the user clicks on the push notification.
* **Go to page**: the user will navigate to the app screen URL specified in the text input field under the action selector. [See here how to get the URL for an app screen](/integrations/push-notifications/how-to-get-a-bravo-page-url.md).
* **Open URL**: an external URL will be opened in the mobile browser.
* **Refresh**: the app screen will be refreshed. In case it's bound to API requests, these requests will be performed again, and the related data will be updated in the screen.
3. Finally, Click on the "**Send Bravo Vision Test**" button to send the push notification.
{% hint style="info" %}
The **Enable Push notification** trigger is required only once per app. If you are testing in with Bravo Vision and you have already enabled "automatic updates" in Bravo Vision, then you will not get the alert to allow notification in your app as it is already enabled.
{% endhint %}
## :gear: Set up push notifications for live apps
In this section, we'll guide you how to set up push notifications for published apps. It will also work in a debug APK (Android) or TestFlight (iOS).
### Getting the platform-specific assets
### For Android
{% hint style="warning" %}
If you see this warning in your OneSignal account, your push notifications might have stopped working. Skip to step 4 for instructions to generate a **Private Key JSON file**Comment
{% endhint %}
1. Visit the [Firebase Console](https://firebase.google.com/) and **create a new project**.

2. Click on **Create a project** or select an existing one below. If you already have a project for your app, use the same.

3. If not, enter a project name, accept the Firebase terms and press **Continue**.

{% hint style="danger" %}
If you publish several apps with your Bravo account, you should **create one Firebase project for each app**. The tokens cannot be reused for more than one app.
{% endhint %}
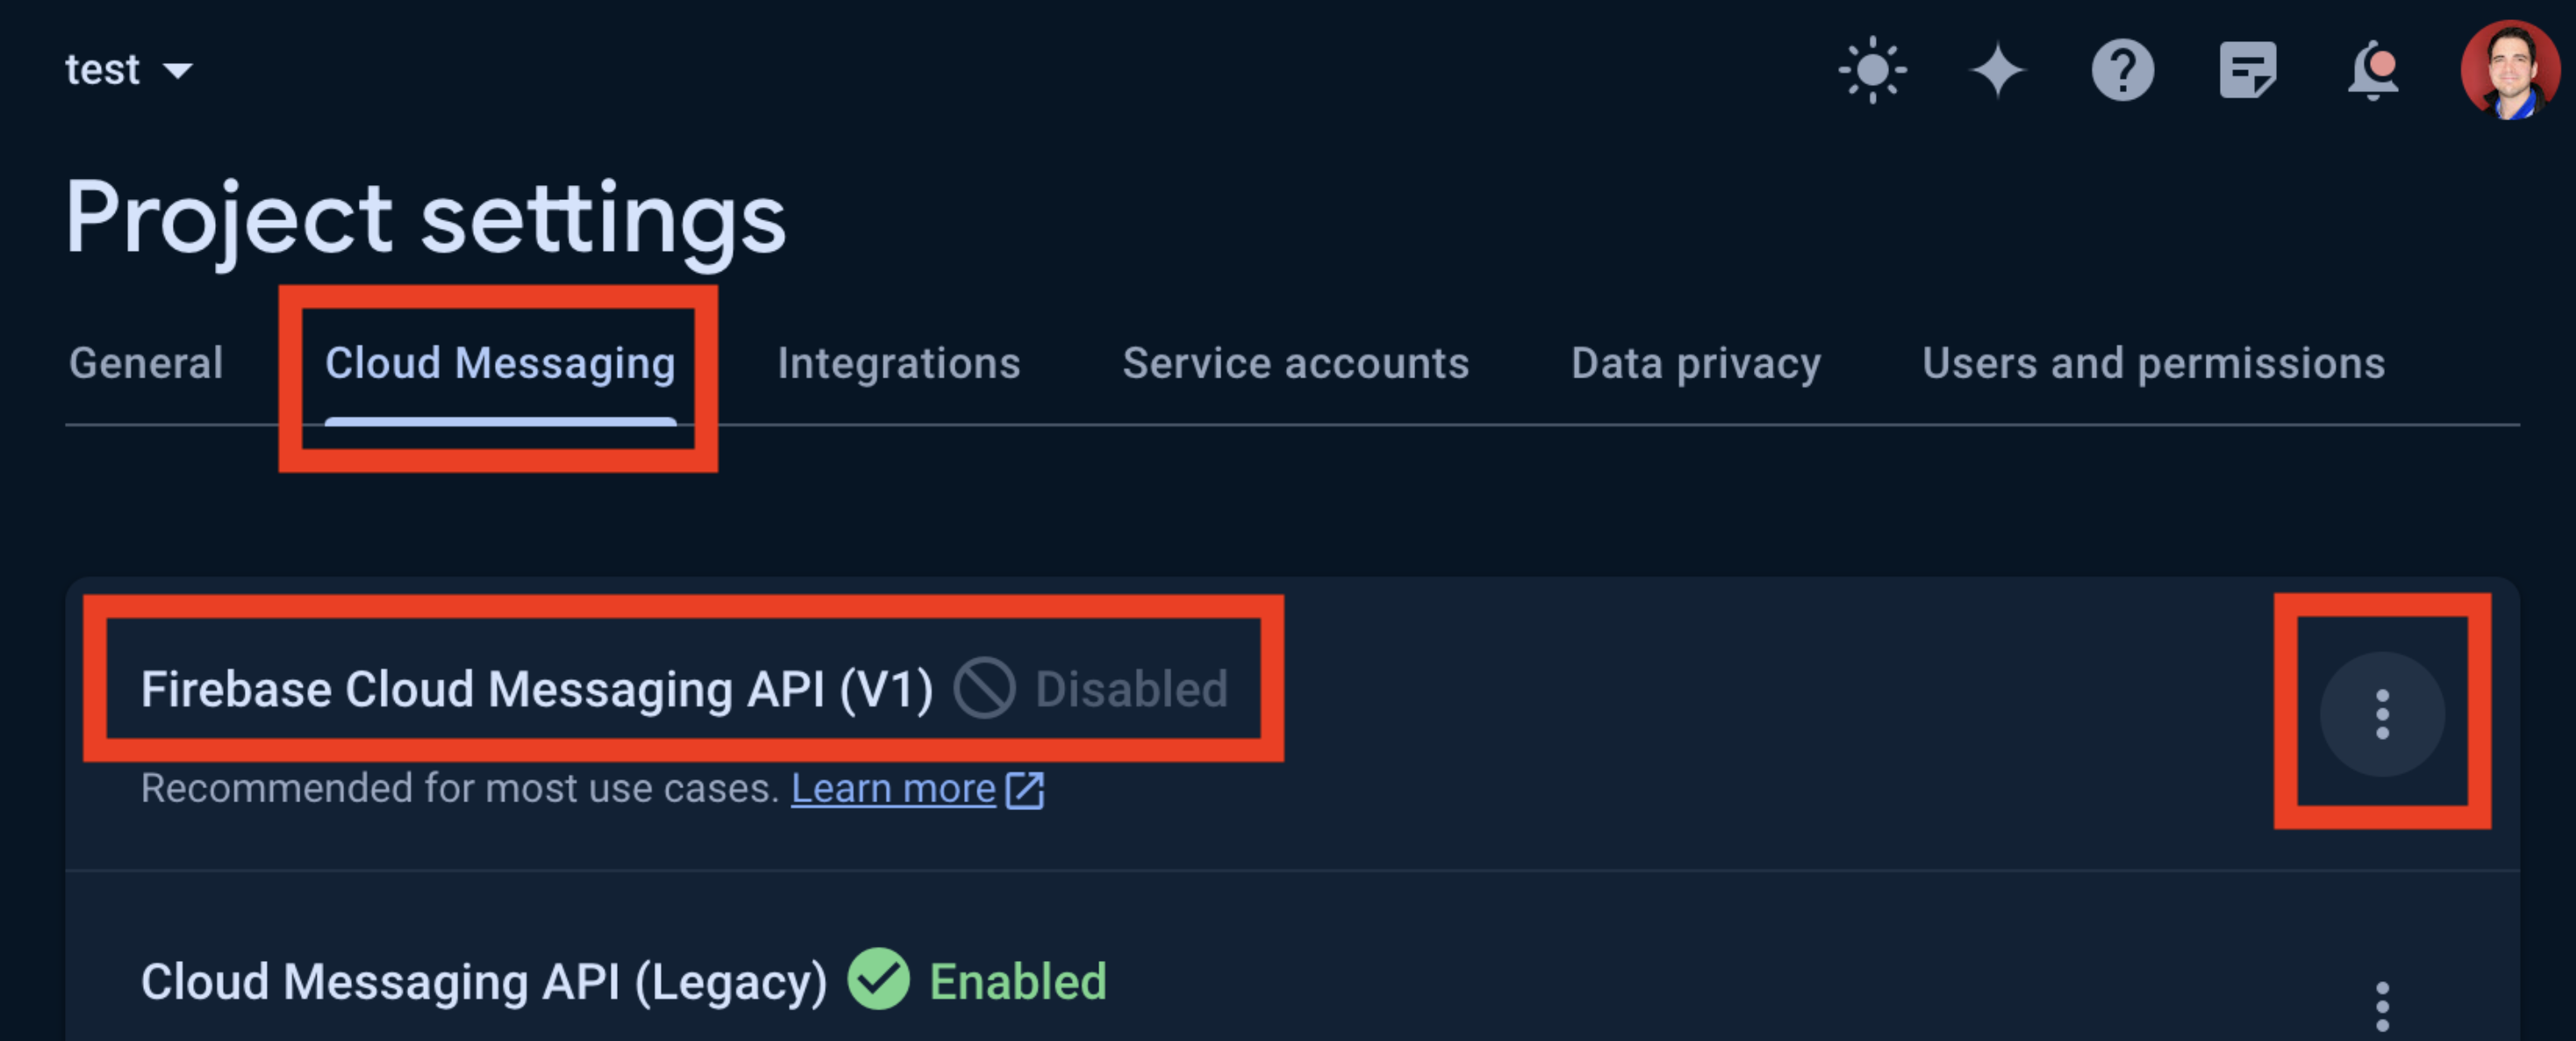
4. Click the gear icon in the top left and select **Project settings**. Then, select the **Cloud Messaging** tab.
5. If you've just created a new project, this should already be enabled by default and you can skip this step. However, if you are using an existing Firebase project, especially an older one, ensure Cloud Messaging API (V1) is enabled. If **Firebase Cloud Messaging API (V1)** is disabled, then click the kebab menu icon on the top right corner and open the link.
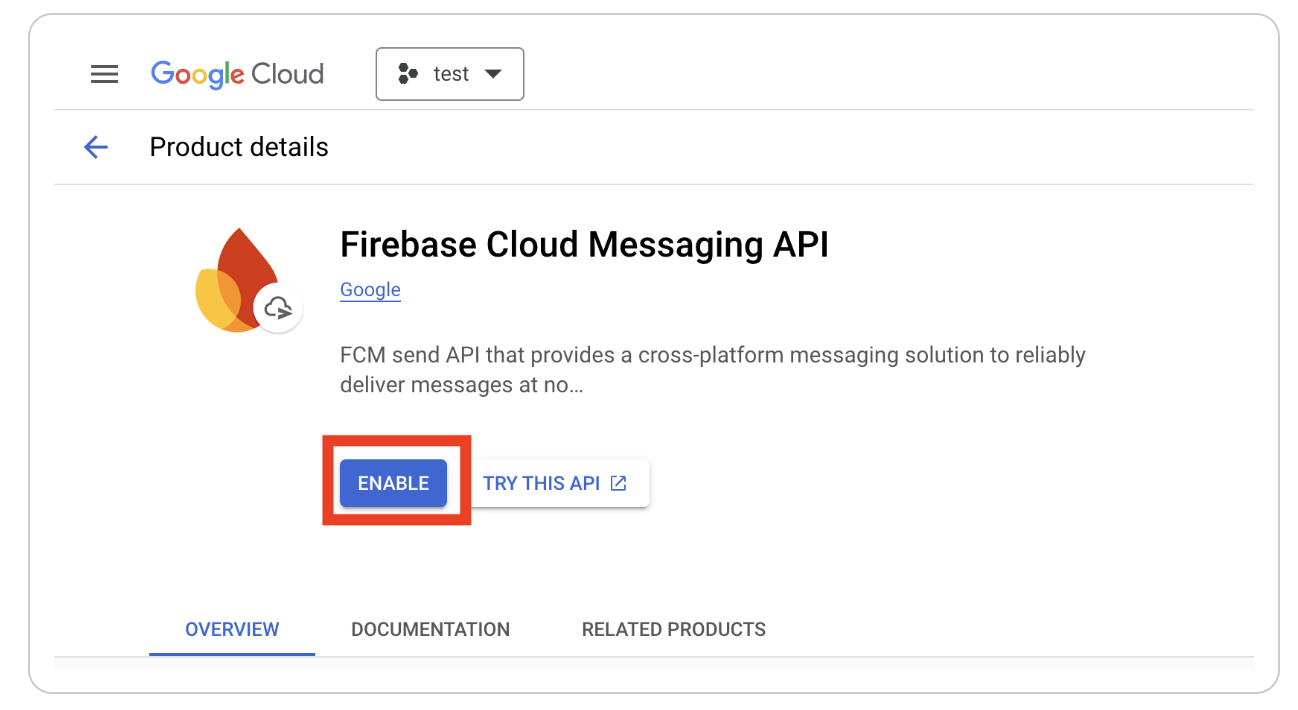
6. On the subsequent page, click **Enable**. You may need to wait a few minutes for the action to propagate to Firebase systems.
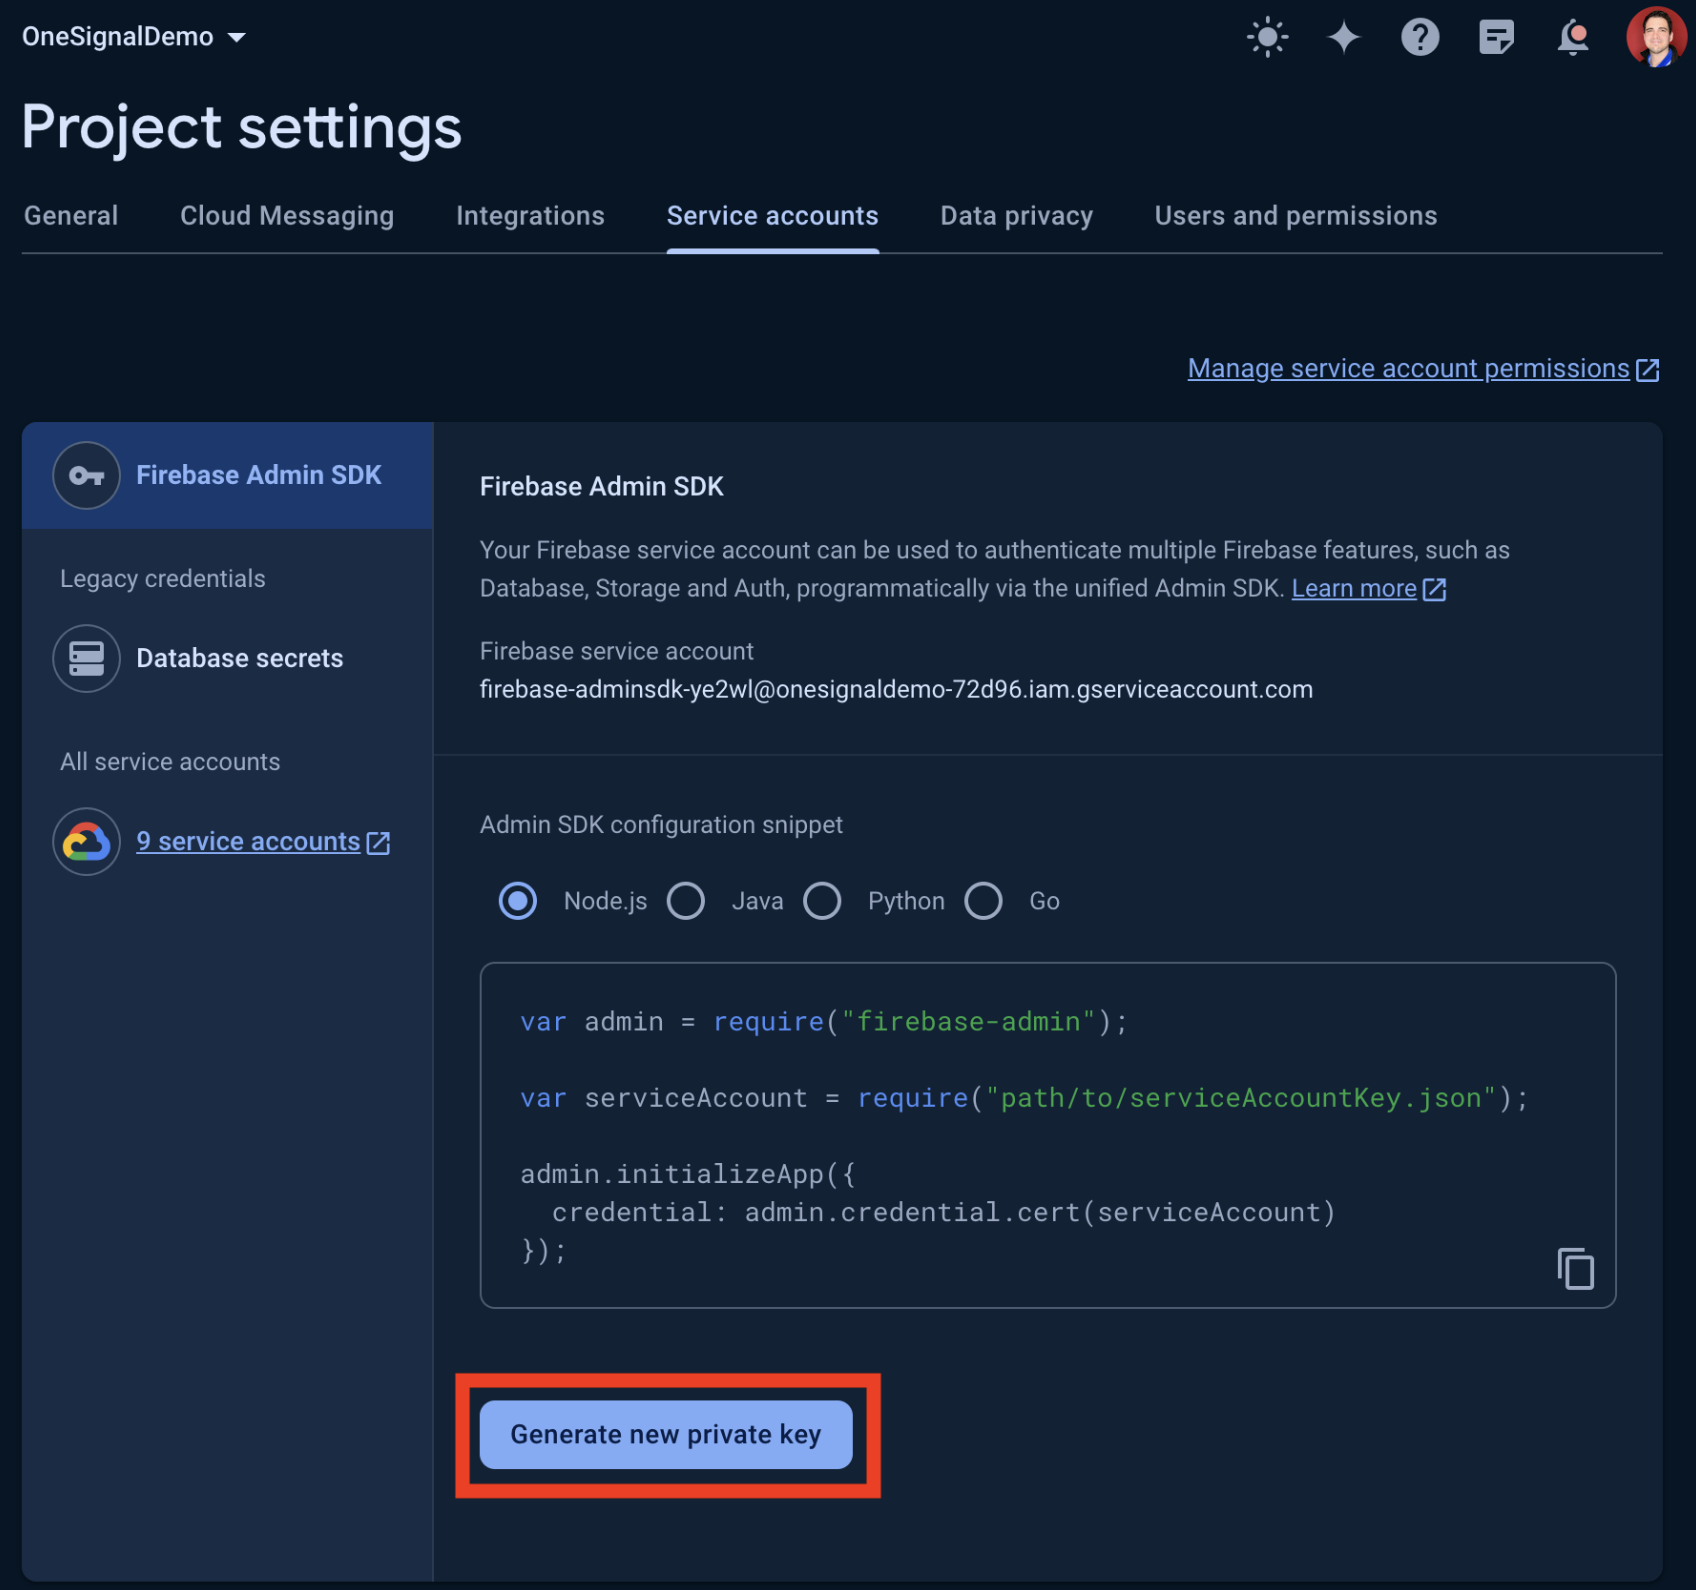
7. Now you need to generate a **Private Key JSON file**. Back in your Firebase **Project Settings**, go to the **Service accounts** tab.
Click **Generate new private key** at the bottom of the page.
8. Save the JSON file somewhere secure. You will need it shortly to upload it to your OneSignal account.
### For iOS
Requirements:
* An iOS mobile app. (This method won't work for websites / web push)
* A [Paid Apple Developer Account](https://developer.apple.com/) with Admin Role.
* An App created on the Apple Developer Account.
**Generate the CSR**
1\. Open the **Keychain Access app** on your macOS system. It is located in **Applications -> Utilities -> Keychain Access**.
2\. At the top menu, select **Keychain Access -> Certificate Assistant -> Request a Certificate From a Certificate Authority...**

3\. Select **Save to disk** and enter your information in the required fields. This creates a certification request file that will be used later.

**Generate the Apple certificates**
1\. Go to the [Apple Developer Portal](https://developer.apple.com/account/) and access the **Certificates** section.
2\. In **Certificates**, click on the **+** button.

3\. Select **Apple Push Notification Service SSL (Sandbox & Production)**, and click **Continue**.

4\. Select the **App ID** (the one **without** the `OneSignalNotificationServiceExtension` suffix.

5\. Click **Continue,** choose the **CSR file** generated before, click **Continue** and finally **Download**.

#### **Generate the p12 file**
1\. On your computer**, open the push certificate file** (aps.cer):

2\. One the **Keychain Access** app, search for the **Apple Push Certificate.** You should see a certificate called "**Apple Push Services ....**" (If it is not there try double-clicking in the downloaded file).
3\. Right click on the **certificate** (make sure it's folded!) and click **"Export "Apple Push Services..."**

You will be asked to enter a password, add one if you want but be sure you remember it later. After entering the password, it asks your computer user password to finish the export.

### Setting up the notifications from Bravo Integrations
Once you have the files and tokens specified in the previous section, it's time to set up the notifications with OneSignal.
In order to unlock the most advanced notifications features OneSignal offers (such as scheduling and API access), you'll need to **create a OneSignal account**. \
\
However, this is optional - you can also use the default **Bravo account for OneSignal.** In this case, you don't need to create a OneSignal account. You won't be able to use the advanced features OneSignal provides, but you'll still be able to send notifications manually from the Bravo dashboard, and include some actions bound to the push notification (such as go to page, or open URL).
### 🧙🏽 Using the Bravo OneSignal account
In case you want to use the default Bravo account for OneSignal, open Bravo and go to `Integrations` → `Notifications` inside your project. There, activate the OneSignal toggle. Once you do that, select Bravo Account in the first step. In the following steps, you'll need to provide the assets for Android and iOS we got in the previous section.
* Android: Firebase Sender Key and Server ID.
* iOS: p12 certificate and password (in case you specified one when generating the certificate).

Once you provide all the assets, click "**Save**". Now, you'll be able to **generate your app bundle**.
{% hint style="warning" %}
In case you already have a published app bundle, and you change these settings, you'll need to generate a new bundle and publish an update to the stores.
{% endhint %}
After you install it on your device (either downloading it from the app stores, or using debug APK or TestFlight), you can start sending notifications from the Bravo dashboard (`Notifications` section on the project dashboard).

### 🧙🏽 Using your own OneSignal account
With your own OneSignal account, you'll be able to leverage all its features for push notifications in the apps, including scheduling, user segmentation, and API access.
Go to [onesignal.com](http://onesignal.com) and create an account. Once you do that, add a new app and select the operating system your app will be published for (iOS, Android or both). You can only select one platform in this step, but in case your app is published on both iOS and Android, you'll be able to add another platform later.

After selecting a platform and clicking `Next`, you'll be asked for the platform-specific assets obtained in the previous chapter \[LINK].
**🤖 Android**
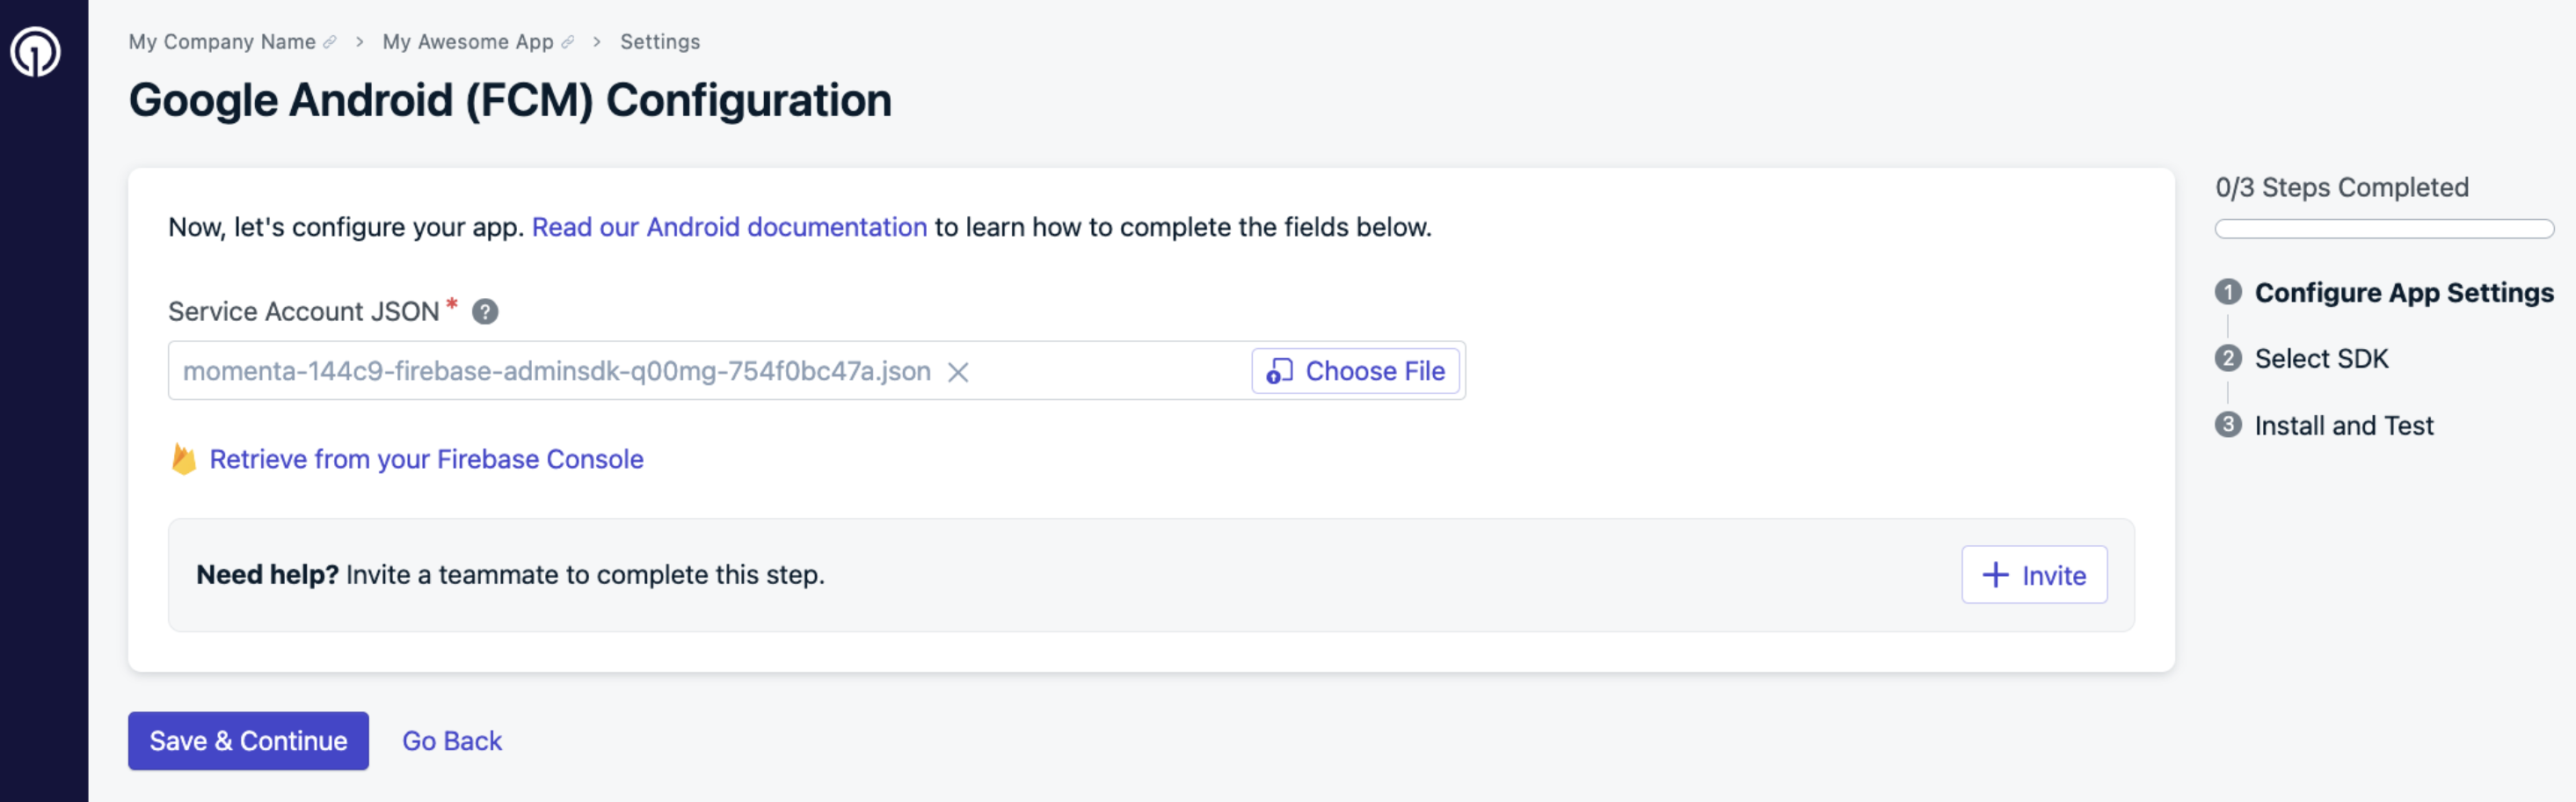
Open the app you just created, and then go to `Settings` → `Platforms`→ `Google Android (FCM)`→ `Activate`. You can also access this dashboard in the process of creating a new app.
Next to "Service Account JSON" select **Choose file** and upload the **Private Key JSON file** you downloaded from your Firebase project in a previous step of this tutorial.
In the next step, select `Native Android`. Then, click Save & Continue.

Finally, you can leave the `Install and Test` section as it is, and click `Done`.
**🍏 iOS**
Open the app you created before, and then go to `Settings` → `Platforms` and select `Apple iOS`. You can also access this dashboard in the process of creating a new app. You'll be asked to upload your .p12 file, and to introduce its password in case you created one for it.

After uploading the .p12 file, click `Save & Continue`. In the next step, select Native iOS. Click `Save & Continue` again.

Finally, you can leave the `Install and Test` section as it is, and click `Done`.
**Setting the OneSignal tokens in Bravo**
Once you've configured your app in OneSignal (for iOS, Android or both), you need to connect your newly created OneSignal app with Bravo. In order to do that, in OneSignal, go to the `Integrations` → `Keys & IDs` section inside the OneSignal app you just created. Copy the `OneSignal App ID` and `Rest API Key` values.
{% hint style="warning" %}
The OneSignal App ID cannot be changed once an app build is generated. If you change the App ID, you must request a new build. Otherwise, you may see "0" users registered in OneSignal.
{% endhint %}
Then, go to Bravo and enter your project dashboard. Go to `Integrations` → `Notifications` and activate the OneSignal toggle. Select `My Account` and paste the values copied in the previous step. Then, click `Save`.

Now, you'll be able to **generate your app bundle**.
{% hint style="warning" %}
In case you already have a published app bundle, and you change these settings, you'll need to generate a new bundle and publish an update to the stores.
{% endhint %}
After you install it on your device (either downloading it from the app stores, or using debug APK or TestFlight), you can start sending notifications from the OneSignal dashboard (and also from the Bravo notifications section). Feel free to explore all the options OneSignal has to offer, so you are able to make the most of the tool.

## Using the OneSignal API
In case you're looking for more flexibility and control, you can use the OneSignal API, creating a script or using another tool. This will allow you, for instance, to send targeted notifications (to one user o a group of users), send a notification when a specific event happens, or any other functionality you create with your own program or tool.
{% hint style="info" %}
This is an advanced option that requires some technical knowledge and coding skills.
{% endhint %}
You can check out the OneSignal API documentation [here](https://documentation.onesignal.com/reference/create-notification). We encourage you to try out all the options yourself, to unlock all the power of the API.
Below, we describe how to get the URL for a specific app screen. This URL can then be used to send a notification that will open a specific screen in the app, when the user clicks on the push notification.
## Creating a "Go to page" notification action via OneSignal API
First, we need to get the internal URL of the page we want to link, we can get the URL of that page manually using Bravo Vision ([Long press once you're in that page and Select Copy Page URL](/integrations/push-notifications/how-to-get-a-bravo-page-url.md)), or you can generate Bravo Links if the process needs to be automated.
#### Generating Bravo internal URLs dinamically
A Bravo internal URL looks like this
```
https://apps-service.bravostudio.app/devices/apps/{{app-id}}/node/{{node-id}}
```
We will need the following information, `app-id`, `node-id` and some params if some elements in the page are bound to external data.
How to get `app-id`:
Open your app project in the Bravo dashboard, and copy the identifier in the URL between `/apps/` and `/screens`
How to get `node-id`:
In your Bravo project screens, clicking on each page, the URL will look like this:
```
https://projects.bravostudio.app/apps/XXXXXXXXX/screens/XXXXX/bindings
```

The `node-id` is the string between /screens/ and /bindings/.
Optional Query strings:
* `params`: is a Base64 encode of a plain JSON containing the input parameters needed to fullfill the bound requests. Example `{"input-name": }`
* `state`: is a Base64 encode of a plain JSON containing the pagination state: `{ "limit": number, "start": number }`
Below, we show code examples of how to generate the URL in case the target page has bound data. For instance, a detail page where the displayed data will depend on the associated ID.
Example with PHP (test the snippet ):
```
$recordId,
]));
$url = "https://apps-service.bravostudio.app/devices/apps/$appId/node/$nodeId?params=$params";
echo $url;
```
Example with Javascript:
```
appId = 'appID';
nodeId = 'nodeID';
recordId = 'recordID';
params = Buffer.from(JSON.stringify({
Id: recordId,
})).toString('base64');
url = `https://apps-service.bravostudio.app/devices/apps/${appId}/node/${nodeId}?params=${params}`;
console.log(url);
```
Where **appId** and **nodeId** are:
`https://projects.bravostudio.app/apps//screens//bindings`
and `recordId` is the ID of the data item associated to the detail page.
#### Generating the API request message
To create a push notification via OneSignal API, this is the endpoint that needs to be targeted (via **POST**):
```
https://onesignal.com/api/v1/notifications
```
The JSON body you need to use in the request is the following:
```
{
"app_id": "",
"include_player_ids": [""],
"contents": {"en": "Text in English."},
"data": {
"action":"goto",
"params":
{"href": "node-id",
"hrefRemote": "https://apps-service.bravostudio.app/devices/apps/{{app-id}}/node/{{node-id}}"
}}
}
```
* **app\_id**: The OneSignal application ID. It can be found on OneSignal, in the [Keys & IDs](https://documentation.onesignal.com/docs/accounts-and-keys) section.
* i**nclude\_player\_ids**: This is used to send notifications only to specific devices or users. Read more in the OneSignal API reference.
* **contents**: here, you need to specify the message of the push notification. In the example, the text is in English.
* **data**: this JSON object contains the following objects inside it:
* **action**: the action that the push notification will trigger when it's pressed. To create a go to page action, we need to set it to `goto`.
* **params**: this object will contain another two objects:
* **href**: here, we'll specify the node-id as defined [here](#generating-bravo-internal-urls-dinamically).
* **hrefRemote**: this will be the Bravo internal URL specified [here](#generating-bravo-internal-urls-dinamically).
---
# Agent Instructions
This documentation is published with GitBook. GitBook is the documentation platform designed so that both humans and AI agents can read, navigate, and reason over technical content effectively. Learn more at gitbook.com.
## Querying This Documentation
If you need additional information that is not directly available in this page, you can query the documentation dynamically by asking a question.
Perform an HTTP GET request on the current page URL with the `ask` query parameter, and the optional `goal` query parameter:
```
GET https://docs.bravostudio.app/integrations/push-notifications.md?ask=&goal=
```
`ask` is the immediate question: it should be specific, self-contained, and written in natural language.
`goal` is optional and describes the broader end goal you are ultimately trying to accomplish on behalf of the user. GitBook uses it to tailor the answer towards what is most useful for that goal.
The response will contain a direct answer to the question and relevant excerpts and sources from the documentation.
Use this mechanism when the answer is not explicitly present in the current page, you need clarification or additional context, or you want to retrieve related documentation sections.